Why a lovely take can come out crunchy
Hello, and welcome back to Kitchen Table Recording. I'm Magnus, and this column is about getting your song down at home with the gear you already have, then sharing it with your fans. This time it's one small knob that causes a surprising amount of grief: the gain.
Here's the problem in plain words. Every recording setup has a ceiling, the loudest level it can store. When your singing or strumming hits that ceiling, the tops of the sound get flattened, and what you hear back is a harsh, fuzzy crackle on the loudest notes. That's called clipping, and those flattened peaks are distortion that cannot be undone. The only real cure is to set the level properly before you play.
Our guide to recording a decent demo with the phone you already own covers where to put the phone and how to tame the room. This one picks up where that stops: the level settings on your interface, recorder or recording app, and what the meter should show before you hit record. Nothing here needs new gear, just a few minutes and a bit of patience.
Find the knob that actually changes the recording
Most home setups have more volume controls than anyone needs, and they don't all do the same job. Preamp gain (the knob on your interface or recorder, often labelled Gain or Input) and your computer's input level change what gets recorded. Application faders, the monitor volume and the headphone knob usually only change what you hear.
That difference matters more than it sounds. In Audacity, for example, the playback volume slider only changes how loud your speakers are; it doesn't touch the audio in your project at all. So if a take sounds too quiet in your headphones, turning up the headphones is the right fix. If it looks too quiet on the recording meter, that's a job for the gain knob, and no amount of headphone volume will change what's been captured.
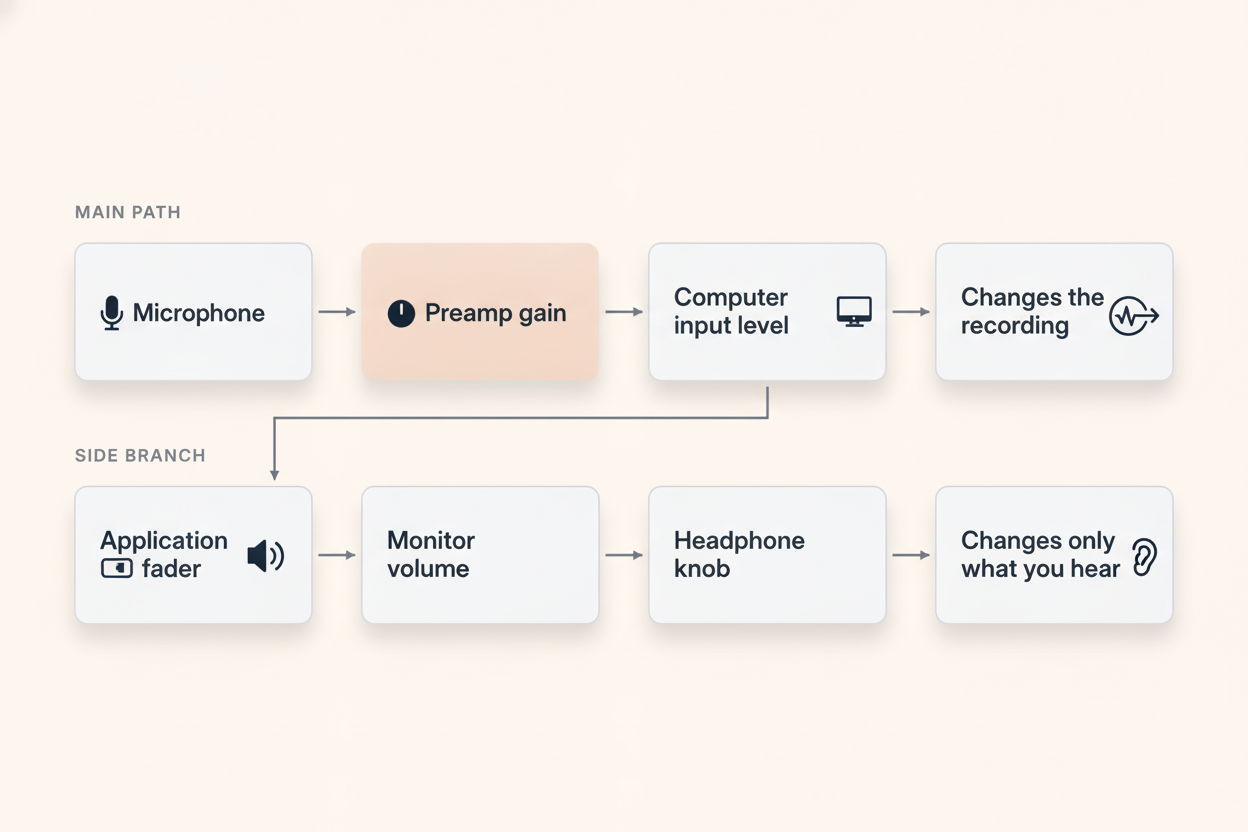
Why does the gain knob exist at all? Microphones put out a tiny signal. Shure's documentation for its SM7B describes a mic signal around -69 dBV that has to be raised toward line level, with an example of roughly +60 dB of preamp gain. You don't need to remember those numbers. They simply show how much lifting the preamp does, and why it's the place where your level really gets set.
The trouble often starts when two controls both add gain. A hot preamp plus a boosted input level in your recording app can push peaks over the ceiling even when neither setting looks extreme on its own. Each knob looks sensible; together they're too much.
The fix is an order of work. Start with every gain setting at zero and adjust from the source first, meaning the preamp on your interface or recorder, then anything further along the line. Working that way keeps noise down through the whole system, as one reply on Adobe's community forum puts it. The preamp should also suit what's coming in: turn it up for a quiet source and down for a loud one, or the preamp overloads and distorts.
What the meter should say before you press record
Your recording meter measures level in dBFS, short for decibels relative to full scale. Zero is the absolute ceiling and everything usable sits below it, so the numbers you'll see are negative. That trips a lot of people up at first: -12 is quieter than -6, and -6 is quieter than 0.
Audacity's meter makes this easy to read. The bars stay green until -12 dB, turn yellow as the signal approaches -6 dB, which the manual calls a good maximum level to aim for, and go red above -6 dB to warn that clipping may happen. The manual suggests peaks around -6 dB because that leaves you headroom for volume changes when you edit afterwards. If a red bar appears to the right of the meter, that's the clip indicator; it lights up once four or more samples in a row go past the maximum.
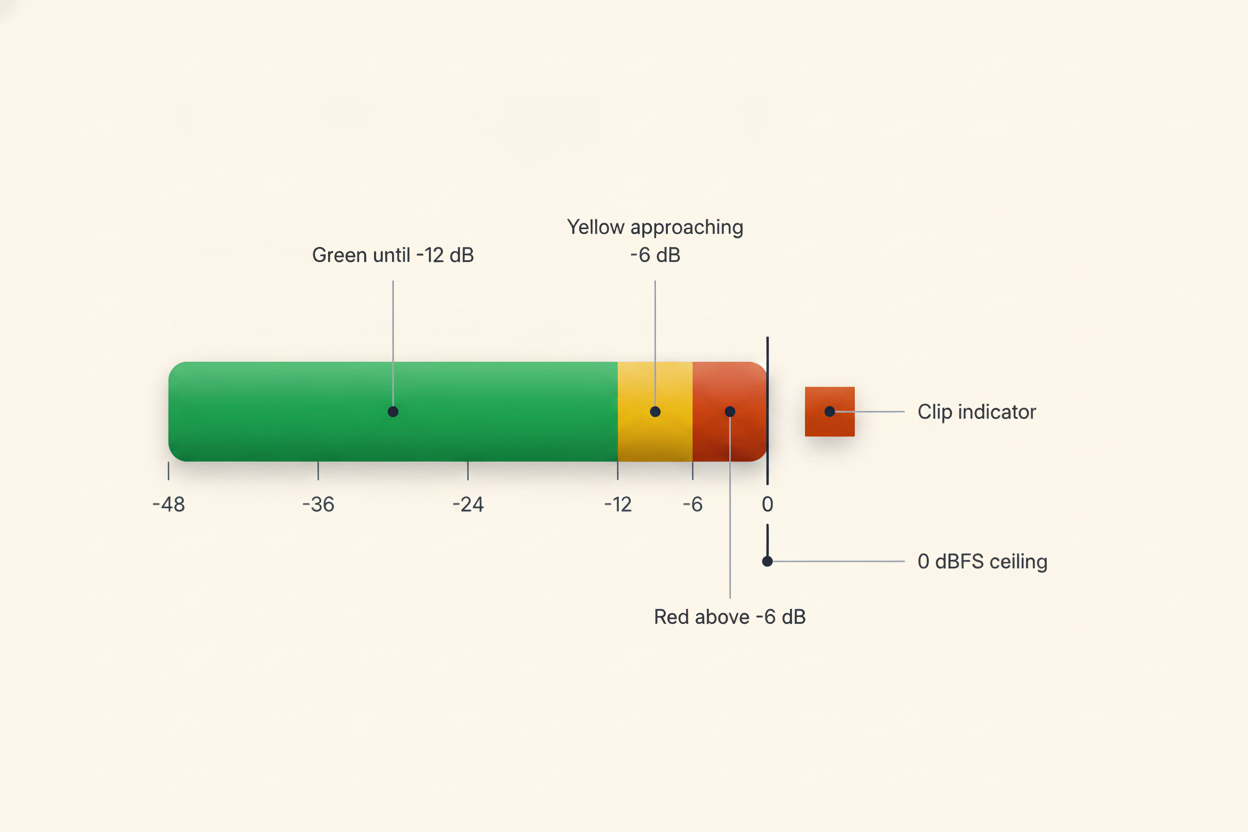
If you use a different app or a handheld recorder, its meter may have no colours at all, so it helps to know the numbers other people give.
| Source | Where peaks should land | Why |
|---|---|---|
| Focusrite | Around -12 dBFS | Leaves room for a loud moment |
| Adobe community forum reply (speech) | About 12 dB above your normal speaking level | Occasional peaks don't overload |
| A guitarist on the Kemper forum | -6 to -12 dB for guitars | Called it the sweet spot, from what they'd gathered from sound engineers |
Read side by side, the advice lands in one zone: your loudest moments somewhere between about -12 and -6, and well clear of zero. If that feels timid, it may be an old habit talking. Analog tape wanted you to record hot. Recording digitally at 24-bit doesn't need that, and running near the ceiling mostly buys you a higher chance of distortion and a harder time balancing your tracks later. A take that peaks at -10 is plenty loud enough to work with.
A five-minute level check before the real take
Test your recording level before you record for real. Monitoring lets you watch the meter without recording and deleting a test track, as the Audacity manual points out. Here's a simple routine for that check, whatever you record with.
Setting your level before you record
- 1. Start at zero Turn the preamp gain and your app's input level all the way down.
- 2. Set your listening volume Make the headphones comfortable. This doesn't change the recording, so set it and leave it.
- 3. Play your loudest bit Sing or play the biggest part of your song, at full performance volume.
- 4. Raise the preamp gain Bring it up slowly until those loudest peaks land around -12 to -6 on the meter.
- 5. Check the app input Don't boost it on top of the preamp. If you need more level, go back to step 4.
- 6. Watch for red If the clip indicator lights up, turn the preamp down a little and run the loud bit again.
Step three is the one people skip. It's tempting to set the level while noodling quietly, then belt the chorus twice as hard as anything you tested. Set gain while rehearsing the loudest sounds you'll actually make, so those peaks still have room left. For a singer that might be the high note at the end; for a guitarist, the hard strum into the last chorus; for anyone who chats between songs, a laugh or a cough counts too.
There's a bolder method you may come across, especially if you play guitar through amp-simulation plugins: play as hard as possible, raise the input gain until the signal clips, then dial it back a bit so it no longer clips. Neural DSP's support team gave that advice for getting the most out of their guitar plugins, and says it gives the best signal-to-noise ratio. It's a fair way to find the top of your setup, but it leaves very little room for a surprise, and that room is exactly what the meter targets above are protecting. If you're recording vocals or an acoustic guitar into an ordinary recording app, the gentler targets are the safer bet.
When the red light comes on anyway
It happens. You get carried away in the last chorus, and that's a good sign about the performance, if not the meter. If your app or interface has a limiter or clip-protection setting, it's a useful safety net for the unexpected. It isn't a substitute for setting the gain properly, though. It can stop ugly distortion when something surprising happens, but it doesn't give back the headroom you already gave away, and if it's working regularly, your gain is set too high.
A healthier-looking meter isn't a clean take
If a take clipped at the preamp, lowering your computer's input level makes the meter look healthier without recovering the distorted audio. Turn the preamp down and record that part again.
So after a big take, glance at the clip indicator before you move on. If it's clear and your peaks sat in that -12 to -6 zone, you've got a clean recording with room to edit, and your song is ready for the next job. Levels are only half of a good home demo, though. The other half is where the mic sits and what your room does to the sound, which is where the phone guide comes in.
Recording a Decent Demo With the Phone You Already Own Read: Recording a Decent Demo With the Phone You Already Own
From the series Kitchen Table Recording
Sources
- Microphone Gain Staging for Creators: Set Levels Without Clipping | CreatorDesktop – creatordesktop.com
- Meter Toolbars – Audacity Manual – manual.audacityteam.org
- Adjusting Gain From Microphone or Tascam or Focusrite | Community – community.adobe.com
- Troubles with gain staging in Focusrite 2i2 and Reaper – Profiler – Questions and answers – Kemper Profiler Forum – forum.kemper-amps.com
- Optimal input level for highest accuracy when using NDSP plugins? – Plugins – Neural DSP – unity.neuraldsp.com